

Third-Axis Leveling
Third-axis has to be set at full draw, by the person who shoots the bow, on that bow. You can do it by shooting it in, or with a plumb line. A sight-leveling jig can't do it, and neither can a draw board.
The first half of this page is the practical side: what third-axis error is, how much it makes you miss, where it comes from, and how to set it. The second half is the proof that it has to be set at full draw, for anyone who wants to check the work.
The Three Axes
Your bubble is a gauge. You hold the bow so the bubble is level on every shot, the same way every time. The three axes are about making sure "bubble level" means what you think it means. First-Axis Leveling defines all three. In short:
- First-axis: the sight's rail is plumb to the plane you actually shoot in.
- Second-axis: when the bubble reads level, the rail is straight up and down with gravity.
- Third-axis: the level is square to the arrow, so the bubble still reads true when you tip the bow up or down for an uphill or downhill shot. This page covers it.
Everything below assumes your first-axis and second-axis are already set.
What Third-Axis Error Is
A bubble vial is a short tube. It reads level when the tube is horizontal. It can't tell which way the bow is pointing.
Third-axis error is that tube turned about a vertical line, so one end sits a little closer to the target than the other. Seen from above, the level is no longer square to the arrow. Call that angle the twist, .
On flat ground, a twisted level reads the same as a square one. Both ends are still at the same height, so the bubble centers with the bow plumb. You never see third-axis error on a flat range.
Now aim uphill. Tipping the bow up lifts whatever sits farther forward by more, so the end of the level closer to the target ends up higher than the other end. The bubble runs toward the high end. To center it again, you cant the bow. Aim downhill and the forward end drops instead, so you cant the other way.
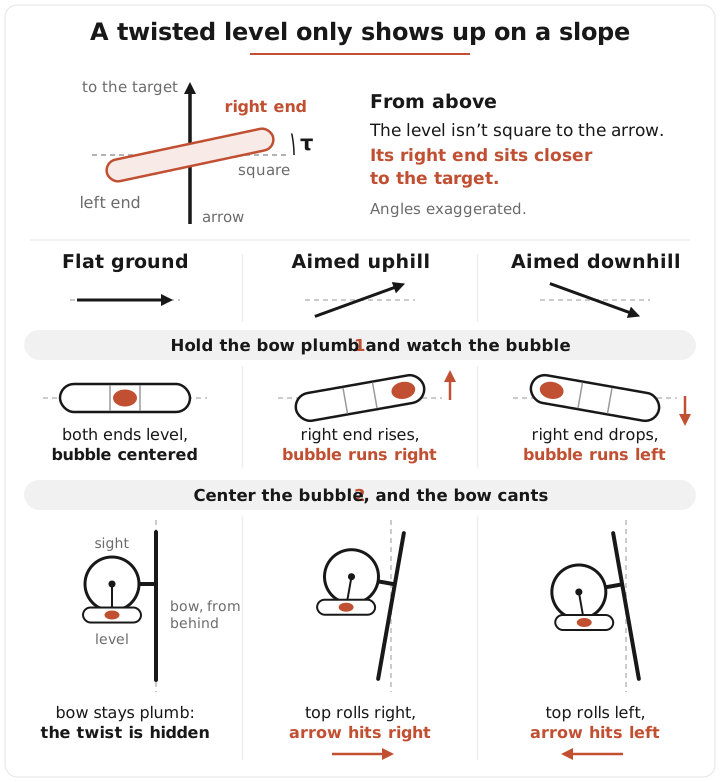
A canted bow throws part of the arrow's drop sideways. The first-axis page covers that miss under Why Leveling for Every Shot Matters, and it grows fast with distance. What is different here is that the cant depends on the angle of the shot: none on flat ground, more as the shot gets steeper, and opposite directions uphill and downhill.
How Much It Makes You Miss
The cant you end up holding is set by the twist and the angle of the shot:
Here is the cant, is the twist, and is the angle of the shot above or below level. For the few degrees of twist a bow has, that is very nearly . On a 45° shot you cant by the full twist, and on a 30° shot by a bit over half of it.
| Shot angle | 10° | 20° | 30° | 45° |
|---|---|---|---|---|
| Cant from 1° of twist | 0.18° | 0.36° | 0.58° | 1.00° |
| Cant from 2° of twist | 0.35° | 0.73° | 1.16° | 2.00° |
| Cant from 3° of twist | 0.53° | 1.09° | 1.73° | 3.00° |
To turn cant into inches, I ran it through the PCA solver with the same hunting bow as the first-axis page (about 69″ of drop at 60 yards and 218″ at 100). My bow has about 2° of twist when I shoot it (how to check yours is below). This is the sideways miss from 2° of twist, with the bubble centered on every shot:
| Range | 10° up / down | 20° up / down | 30° up / down | 45° up / down |
|---|---|---|---|---|
| 20 yd | 0.04″ / 0.04″ | 0.08″ / 0.08″ | 0.12″ / 0.12″ | 0.17″ / 0.17″ |
| 30 yd | 0.10″ / 0.10″ | 0.19″ / 0.19″ | 0.28″ / 0.27″ | 0.40″ / 0.38″ |
| 40 yd | 0.18″ / 0.17″ | 0.35″ / 0.34″ | 0.51″ / 0.49″ | 0.73″ / 0.69″ |
| 60 yd | 0.42″ / 0.41″ | 0.84″ / 0.81″ | 1.25″ / 1.17″ | 1.79″ / 1.63″ |
| 80 yd | 0.81″ / 0.78″ | 1.61″ / 1.51″ | 2.40″ / 2.18″ | 3.46″ / 3.02″ |
| 100 yd | 1.35″ / 1.29″ | 2.73″ / 2.49″ | 4.08″ / 3.57″ | 5.94″ / 4.93″ |
Uphill misses go one way and downhill misses go the other. The miss scales almost exactly with the twist, so 1° costs half of these numbers and 3° one and a half times them.
Inside 40 yards on moderate slopes, this is a fraction of an inch. On a steep or long shot it is inches, and a flat range will never show it to you.
Where the Twist Comes From
The twist isn't a property of the sight. It comes from the bow and from the person shooting it.
The bow's share is cable load. At full draw, the load moves from the string to the cables. The cable guard holds the cables off to one side, so that load twists the riser. How much depends on the cable guard, and some bows use flexible or adjustable cable rods to limit or tune it.
The shooter's share is grip torque. Every archer's hand puts some rotation into the grip, and the amount differs from person to person.
Both happen only at full draw, with a hand on the grip. A bow at rest has neither.
Check your own bow
Sight in as usual, so your arrows hit behind the pin. That puts the pin over the arrow's launch plane at full draw. Then let the bow down to brace, nock an arrow, and look at the pin from behind, against the arrow and the string. It usually no longer sits over them. For a right-handed shooter it typically sits off to the left; for a left-handed shooter, off to the right. Most of that gap is the riser turning between brace and full draw in your hand: cable load and grip together. Some of it can be the string sitting off to the side at brace, so the number below is an estimate.
To estimate the twist, measure the gap and how far the pin sits in front of the pivot point of your grip:
On my bow the pin sits about 0.2″ to the left at brace, and a bit over 6″ in front of the grip's pivot point:
Call it 2°.
A laser clamped to the riser can measure the bow's share alone: with the bow in a draw board or shooting machine, mark the dot on a far wall at brace and again at full draw. The sideways distance between the marks, divided by the distance to the wall, is the cable-load twist in radians. It can't measure your grip's share, because in your hand nothing holds the bow pointed at the same spot between the two marks.
Why a Jig Can't See It
Every leveling method squares the level to something. The twist that matters is the one between the level and the arrow at full draw, with your hand on the grip. This is how much of it each method sees:
| Method | How the sight mounts | The bow's cable-load twist | Your grip |
|---|---|---|---|
| Standalone jig (sight off the bow) | Misses | Misses | Misses |
| Jig on the bow, at rest | Sees | Misses | Misses |
| Draw board, aimed up and down | Sees | Sees | Misses |
| You at full draw: plumb line or shooting it in | Sees | Sees | Sees |
A standalone jig squares the level to the sight's own dovetail or mounting bracket. It never sees the riser, so any misalignment in how the sight mounts adds to the twist, along with everything that happens at full draw. A jig on the bow squares the level to the riser at rest, which misses all of the full-draw twist. A draw board or shooting machine at full draw captures the cable-load twist, but no machine holds the grip the way your hand does.
A jig is still a good place to start, since it gets the sight square to itself. The full-draw check has to come after it.
How to Set It
Set first-axis and second-axis first. Then use one of these two methods, at full draw, with your normal grip and your normal anchor.
With a plumb line
Hang a long plumb line somewhere you can aim steeply up at it and steeply down at it, such as a stairwell, a tree or a balcony. Steeper is better: 35° or more each way.
You need a vertical reference on the sight that is square to the bubble: a multi-pin's pin stack, or a third-axis tool that clips onto the sight and gives you a long line to look at. With second-axis set, that line is plumb whenever the bubble is centered on flat ground.
- Draw, aim steeply up the plumb line, and center the bubble.
- Check whether your reference line runs parallel to the plumb line.
- Do the same aimed steeply down.
If the reference line leans one way uphill and the other way downhill, the level is twisted. You can also do it the other way around: hold the reference line on the plumb line and watch the bubble. With 2° of twist on a 45° shot, it sits about 1.4° off center, which is a half bubble or more on most levels.
To see which way to turn the level, hold the reference line on the plumb line. Aimed uphill, the bubble runs toward the end of the level that is too far forward. Turn that end back toward you, and check again.
Hold the bow the way you shoot it. If you grip it differently to aim at a string, you measure a different twist.
By shooting it in
Sight in on flat ground. Then shoot groups at a steep uphill target and a steep downhill target, at the same distance, with the bubble centered on every shot.
If the uphill group lands to one side and the downhill group to the other, the level is twisted. Uphill misses go toward the end of the level that is too far forward. Turn that end back toward you.
Tune the bow first. An arrow that leaves with yaw shifts its groups for reasons that have nothing to do with the level (see What the Proof Leaves Open), and that shift can hide or mimic the third-axis signal. The plumb line method doesn't depend on arrow flight, so it isn't affected.
The signal is small. From the table above, 2° of twist at 60 yards and 30° is about 1.2″ each way, so the two groups land about 2.4″ apart. That is easy to lose in group size or a breeze. Pick a calm day, a steep slope and as much distance as you shoot well, and shoot several arrows each way.
Recheck when anything changes
The twist belongs to the bow and the shooter, so a change to either can change it: a new bow, a new cable guard setting, a different grip, a different shooter. Recheck third-axis after any of those.
The Proof
Claim
If the level is twisted by about vertical, relative to a line square to the arrow's launch line, then centering the bubble on a shot inclined at forces the bow to cant about the arrow by , where:
The cant is zero on flat ground for any , so flat ground can't detect the twist. The only twist that gives zero cant at every angle is , measured in the condition the bow is shot in: at full draw, in the shooter's hand. Any other method squares the level to a different reference and leaves part of the twist behind.
Setup
Axes: points downrange (horizontal), up, to the shooter's right. On a flat shot the arrow points along .
- The bubble is a line sensor. A tube vial centers exactly when its axis is horizontal, meaning . It reads gravity alone.
- The twist. The arrow's launch line is the line a tuned arrow leaves on, at full draw in the shooter's hand. At the shot, the level is turned by about vertical relative to a line square to it, with positive swinging its right end toward the target. With the bubble centered on flat ground, .
- Second-axis is set. The sight rail is vertical when the bubble is centered on flat ground.
- You bend at the waist. An incline of (uphill positive) rotates the bow, arrow and sight together about . The twist doesn't change with .
- You re-level by canting. To center the bubble you roll the bow by about the arrow (positive rolls the top of the bow right). Rolling about the grip instead, and putting the pin back on the target, don't change : a roll about any line parallel to the arrow is the same rotation, and a small turn left or right keeps a horizontal tube horizontal.
Step 1: Incline the shot
Rotating by about sends the arrow and the vial to:
The vial's vertical component is , so held plumb it is off level by . That is zero only if or .
Step 2: Split the vial along the arrow
The part of along is unchanged by any roll about :
The remainder is : horizontal, pointing right, with length .
Step 3: Roll about the arrow
The parallel part stays put, and the remainder turns in the plane square to the arrow. That plane is spanned by and the tipped-up "bow up" direction . The vial becomes:
Step 4: Center the bubble
Set the vertical component of to zero:
The other root, 180° − , is the bow upside down. A solution exists while , which for 3° of twist covers every shot below 87°. For small twists, .
A brute-force check, building the twist, incline and roll as rotation matrices and solving numerically for the roll that centers the bubble, matches the closed form to within degrees across 40 cases ( from 0.5° to 5°, from to ).
Corollaries
-
Flat ground can't detect the twist. At , for every . You can turn the third-axis adjustment freely on flat ground and the bubble never moves.
-
Only works at every angle. for all requires .
-
The twist that counts is the one at the shot. The bubble reads gravity at the moment of the shot (Setup 1), and the arrow leaves at that moment, at full draw in your hand. So is the twist in that condition. With the bow tuned for that shooter, the arrow leaves straight along its launch line, whatever cable load and grip torque did to the riser and rest on the way; tuning and sighting in fix that line. How the level sat earlier only matters through how far it turns relative to that line.
-
Every other method leaves part of the twist behind. On the way from a leveling method's condition to the shot, the level can turn about the riser's near-vertical axis in three ways: how the sight sits on the riser (), cable load between brace and full draw (), and your hand on the grip, relative to the launch line tuning set (). A draw board or shooting machine neither grips like your hand nor sets the launch line your hand does, so it can't reproduce . Turns about the same axis add. A method zeroes the turns that have already happened in its condition, and the rest stays in :
Method Twist left in Standalone jig Jig on the bow, at rest Draw board or shooting machine You at full draw By Corollary 2, any of these that isn't zero cants the bow on angled shots. None of them is zero in general (see Where the Twist Comes From); on my bow cable load and grip together are about 1.9°. Only the last row is zero for every bow and shooter.
-
The error has a signature. changes sign between uphill and downhill, so the cant and the miss flip direction. Positive (right end forward) gives positive uphill: the top of the bow rolls right and the arrow goes right. Uphill misses go toward the end of the level that is too far forward.
From Cant to Inches
The pin holds the arrow's launch line above the target, by however much the arrow will drop on the way there. Call that distance , measured square to the line of sight. Canting the bow by swings that offset sideways by , and the arrow, which only ever falls straight down, carries that sideways offset all the way to the target:
The usual shortcut for an angled shot is the rifleman's rule: aim as if the target were at its horizontal distance. The solver doesn't use the shortcut. It flies the shot itself, with drag, and reports the drop across the line of sight. For this bow, the rule is close on moderate downhill shots and runs short on steep ones, uphill most of all:
| Shot at 100 yd | Solver | Rifleman's rule | Rule is off by |
|---|---|---|---|
| 30° down | 182″ | 181″ | −1% |
| 30° up | 195″ | 181″ | −8% |
| 45° down | 147″ | 140″ | −5% |
| 45° up | 162″ | 140″ | −14% |
The rule treats uphill and downhill the same, and an arrow doesn't. Shooting uphill, gravity slows the arrow along its path, so it spends longer in the air and drops more across the line of sight. That is why the uphill misses in the cost table are larger than the downhill ones.
The cost table doesn't come from the formula above. For each shot, the solver finds the launch angle that hits the target. I then cant the whole launch (the arrow's start point and its direction) about the line of sight and find where the arrow crosses the target. With no wind, that is exact: drag acts along the arrow's path and gravity acts straight down, so nothing pushes the arrow sideways after it leaves the bow, and its path seen from above is a straight line. Across every distance, angle and twist in this article, the formula agrees with that calculation to within 5%.
For an estimate in your head, take , where is your flat-ground drop at the same distance. Then for a small twist:
At 60 yards and 30°, that is , against the solver's 1.25″ uphill and 1.17″ downhill.
There is a small vertical effect too. A canted bow lands a little low, by . With 2° of twist that never reaches a tenth of an inch inside 80 yards.
What the Proof Leaves Open
Given a twist between the level and the arrow at full draw, the bubble error, the cant and the miss follow from geometry. The proof doesn't cover these:
- How big your twist is. That is a measurement, and it differs with every bow and shooter. Mine is about 2°.
- Twist about a tilted axis. The proof assumes a pure turn about vertical. A small tilt of the level about the arrow is second-axis error, which setting second-axis removes. A small tilt about the crosswind axis doesn't move the bubble on flat ground or change the result to first order.
- Shot-to-shot torque. Setting third-axis at full draw captures your typical grip. A shot where you torque the bow differently has a different twist.
- A bow that isn't tuned. The cant result is pure geometry and doesn't depend on how the arrow flies, but the miss numbers, and shooting it in, assume the arrow flies along the line it is launched on. An arrow that leaves the bow with yaw (nock left or right, the tear paper tuning shows) gets straightened by its fletching, and the side force that does it moves the arrow's path off that line: aerodynamic jump, in the fin-stabilized sense, not the rifle term. Sighting in on flat ground absorbs a steady jump, but nothing makes it the same uphill, downhill and shot to shot. Tune the bow so the arrow leaves straight before you shoot third-axis in.
- Canting about the line of sight instead of the arrow. The two differ by the small angle between them, and the effect on the cant is negligible.
Takeaway
Third-axis error doesn't show on flat ground. It shows on angled shots, in opposite directions uphill and downhill. The twist behind it comes from the bow at full draw and from your hand on the grip, so set third-axis at full draw, on that bow, with a plumb line or by shooting it in.