Adjusting for Air Density
Like any good ballistics software, Precision Cut Archery can account for changes in air density. We use density altitude as our air density input.
What is Density Altitude?
Density altitude is like "effective altitude" considering temperature, humidity, and the other contributing factors.
You can think of it like air density wrapped up in a single, easy-to-understand number.
Note
Density altitude may or may not be the same as your actual elevation above sea level.
For example, our headquarters in Minnesota is at 1000ft above sea level. Our DA will vary between roughly -1000 and +4000 feet, depending on the time of year and weather conditions. Density altitude is typically higher in the summer (high temperatures) and lower in the winter (low temperatures).
Measuring or Calculating Density Altitude
The easiest and most accurate method to determine density altitude is to use a ballistic weather meter that provides an ISA-standard density altitude reading, like a Kestrel.
If you don't have a weather meter, or if your weather meter doesn't provide an ISA-standard density altitude reading, there are a couple options:
Use Current Weather Data
No weather meter? No problem! You can use current weather data from your favorite weather app or website to calculate density altitude.
- Click the "Calculate density altitude" button below the density altitude input field.
- Select the "Weather (Barometric)" option.
- Enter your elevation above sea level and the current weather data.
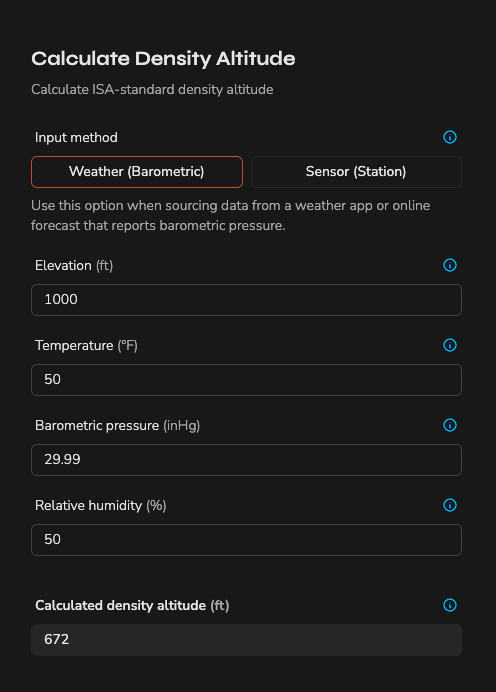
What is Barometric Pressure?
Barometric pressure is the pressure at your location adjusted to sea-level. This is the pressure that you would measure with a barometer. This is primarily used by meteorologists to predict the weather, and can be determined from most weather apps and websites.
Use Field Sensor Data
If you have a field weather meter, but it does not provide a density altitude reading, you can use our calculator to determine the density altitude based on the sensor's readings.
- Click the "Calculate density altitude" button below the density altitude input field.
- Select the "Sensor (Station)" option.
- Enter the sensor's readings for temperature, pressure, and (optionally) relative humidity.
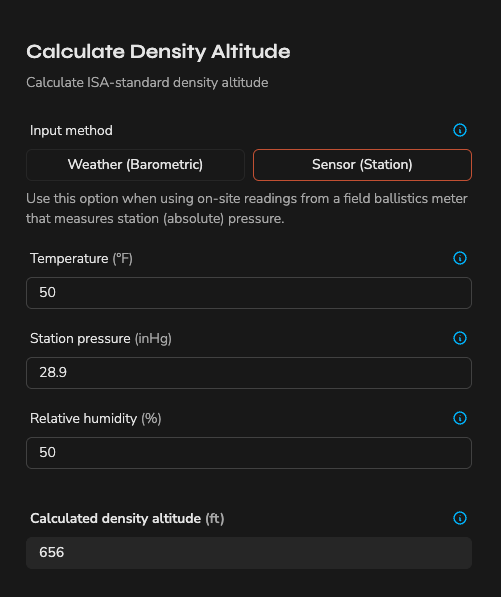
What is Station Pressure?
Station pressure is the absolute pressure reading at your location from the sensor. This is not the same as barometric pressure, which is pressure at your location adjusted to sea-level.
Use Elevation Above Sea Level
Too complicated? You can simply use elevation-above-sea-level in place of density altitude to get close.
This is a good option if you're not traveling, or if you're not concerned about the effects of air density on your arrow flight.
Rules of Thumb
-
When entering density altitude for your sight-in, this should always be the density altitude of the location where the sight-in data was collected. This helps us seed the drag model with the correct air density for the sight-in location.
-
When creating sight tapes, mark sheets, etc., you have the option to adjust this density altitude for remote destinations. For example, maybe you are traveling for a shoot and want to create a sight tape for that location's air density ahead of time. In this case, on the sight tapes page, you would enter the destination's density altitude.
Best Practices when Traveling
When traveling to a shoot or hunt, it's worth at least considering how the environmental factors will affect your sight marks at the destination.
Your Best Bet Might Be to Do Nothing
Depending on your shooting ability, comfort level making bow adjustments, and the distances you'll be shooting, you might be best off leaving your setup as is and just shooting.
-
If you're shooting inside of 60 yards, you likely will not notice a difference in your sight marks. The effects of air density on arrow flight are generally quite small inside of 80.
-
If you don't make sight tapes specifically for broadheads, we don't suggest making tapes for different air densities. The difference in drag between broadheads and field points generally has more effect than the difference in air density between your home and the destination. Yes, even with mechanicals.
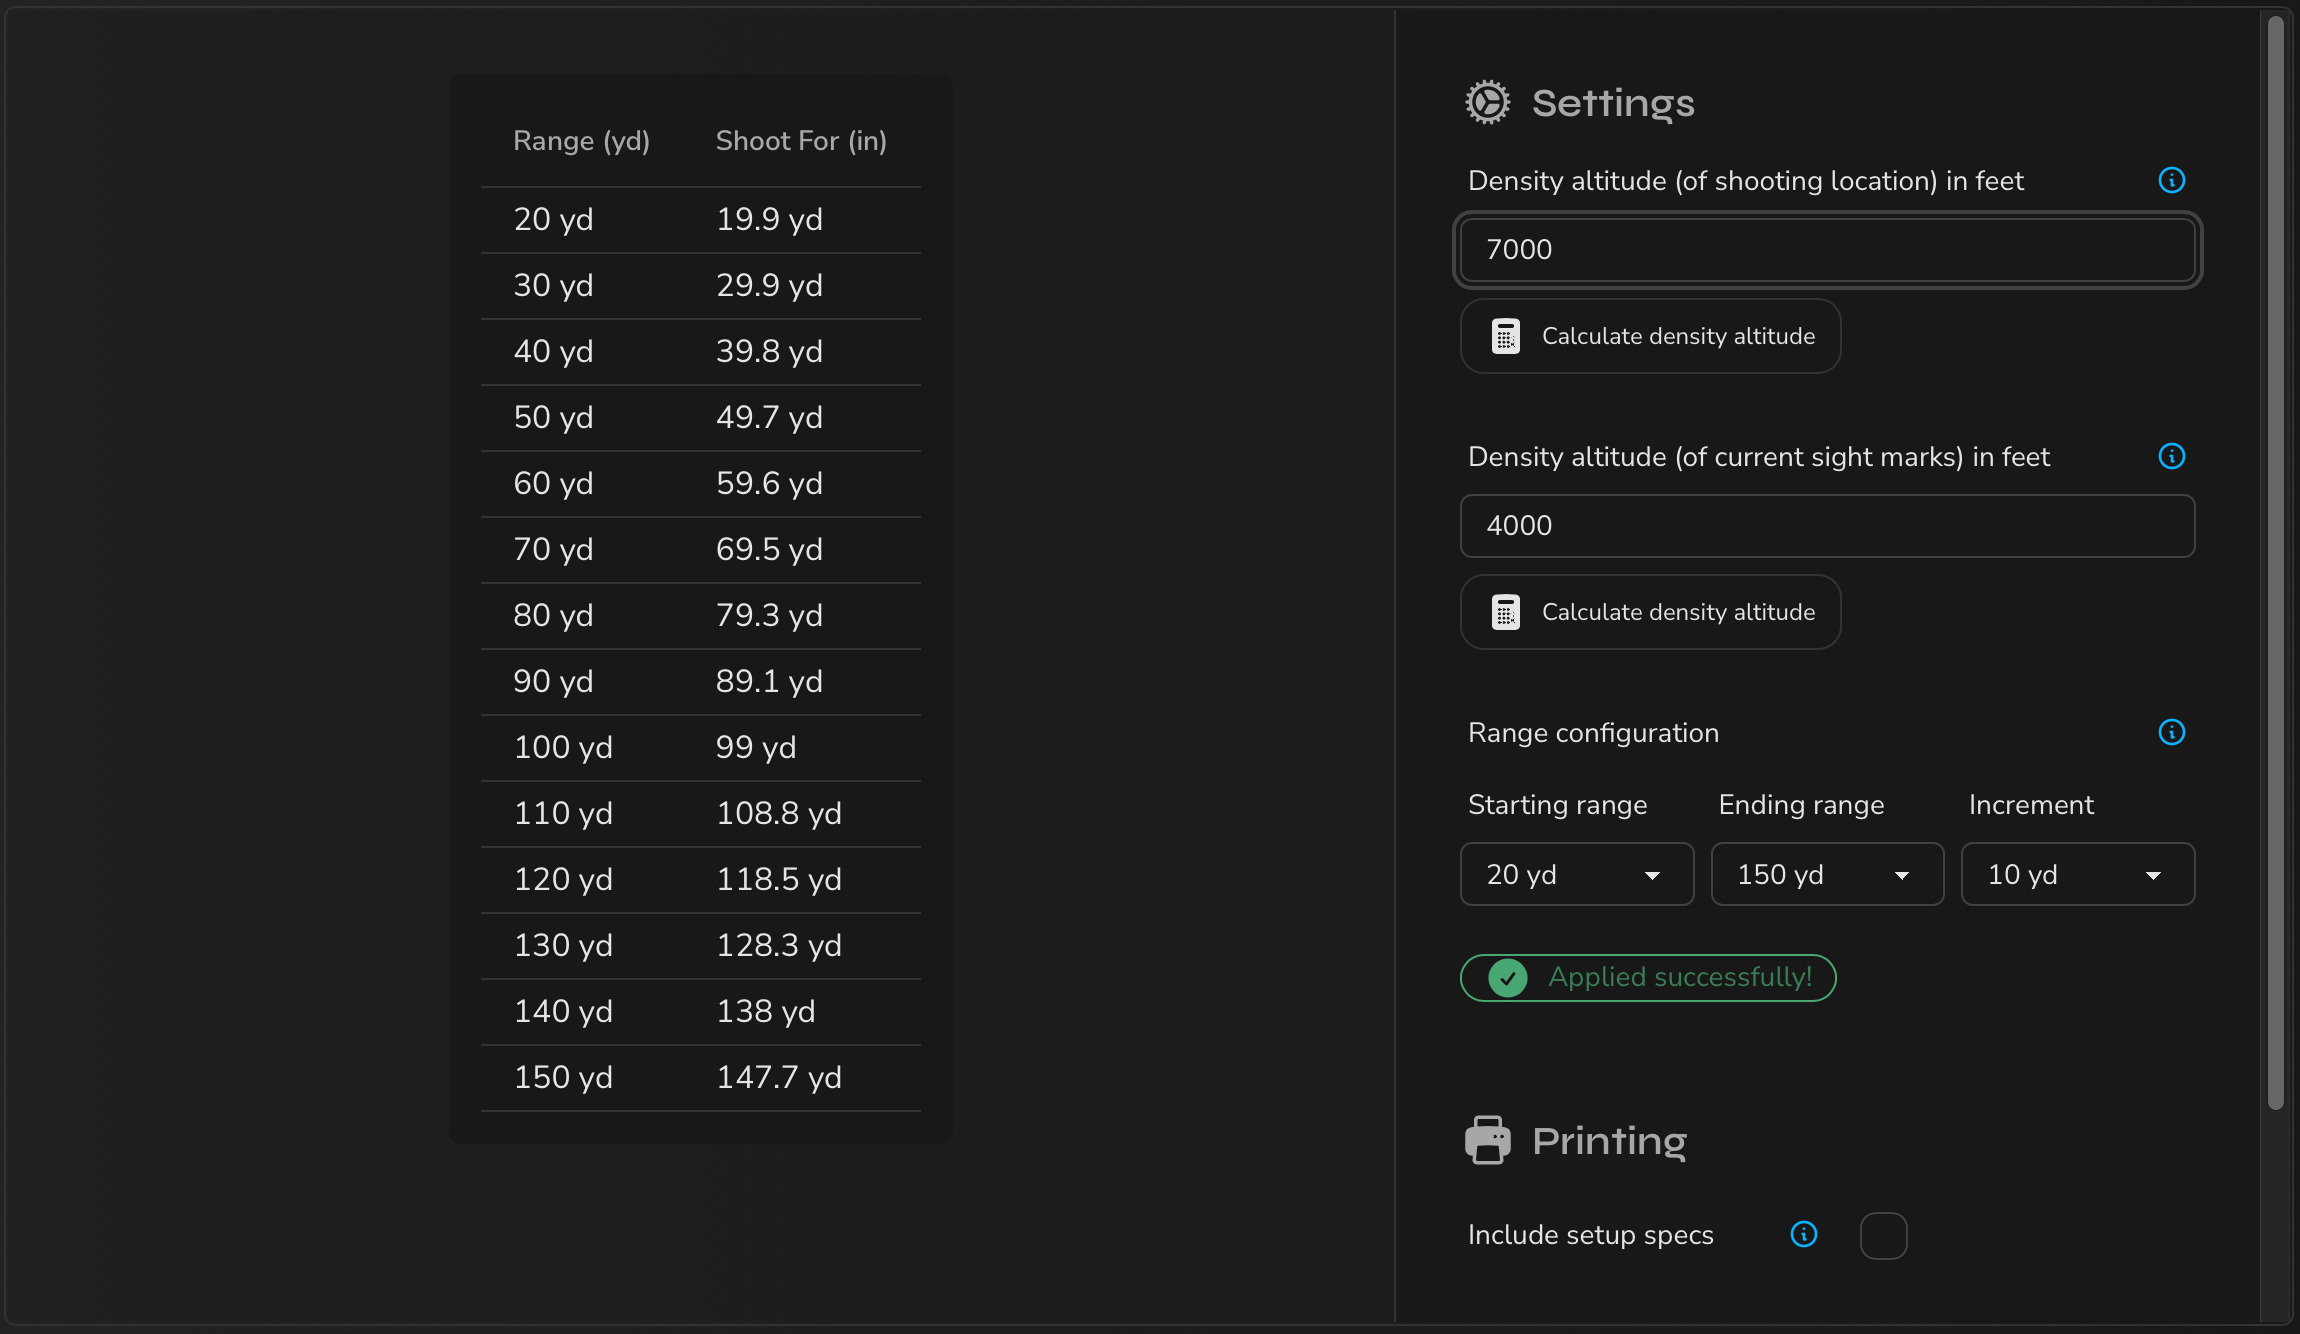
Use the 'Altitude Cuts' Feature
A great option is to use the 'Altitude Cuts' feature to take a quick look at what kind of difference there might be for your setup at different ranges. For example, if I'm 4000ft DA at home, traveling to 7000ft DA, I'll see a conversion table like this. In this case, I might decide that for normal hunting ranges, I'll be close enough using my tape from home. If I need to take a long follow-up shot, I'll just cut a yard or so.
Back Poundage Off Slightly
If you're traveling from low to high elevation, one option to continue running your home sight tape is to back your poundage off slightly. We suggest starting with something like 1/4 turn of the limb bolts. This will reduce the speed of the arrow, effectively compensating for the lower air density at the higher elevation.
Of course, this method requires a fair bit of shooting at long range with your broadheads.
Pre-Print a Sight Tape for the Destination
Another option is to create a sight tape specifically for the destination ahead of time. On the 'Sight Tapes' page, you can enter the destination's density altitude and create a sight tape for that location.
The biggest downside to this is you'll need to make sure the new tape is installed correctly (and the indicator is set correctly) when you arrive at the destination.
We also have a 'Travel Tapes' printing mode. This will print 5x tapes in either 1000ft density altitude or 1.0fps launch speed increments to bring with (your choice). This is a great way to have a few tapes made ahead of time for different conditions.
Note
Regardless of the method you choose, we always recommend validating your sight-in at the destination. Outside of ballistics, there are a lot of things that can go wrong when traveling with a bow!
Tip
By using the 'Altitude Cuts' feature in conjunction with a tape printed for the destination's DA, it's possible to have a tape pre-zeroed for the destination ahead of time.
For example, 99 yards on my home tape should be 100 yards on the destination tape.
- Set the sight to 99 yards on the home tape.
- Lock down the sight.
- Put the destination tape on the sight with the indicator pointing to the new tape's 100 yard mark. Now, the old 99 yard mark is set to 100 yards on the destination tape - exactly what we want!
When we arrive, a quick check should be all that's necessary to make sure nothing is amiss.